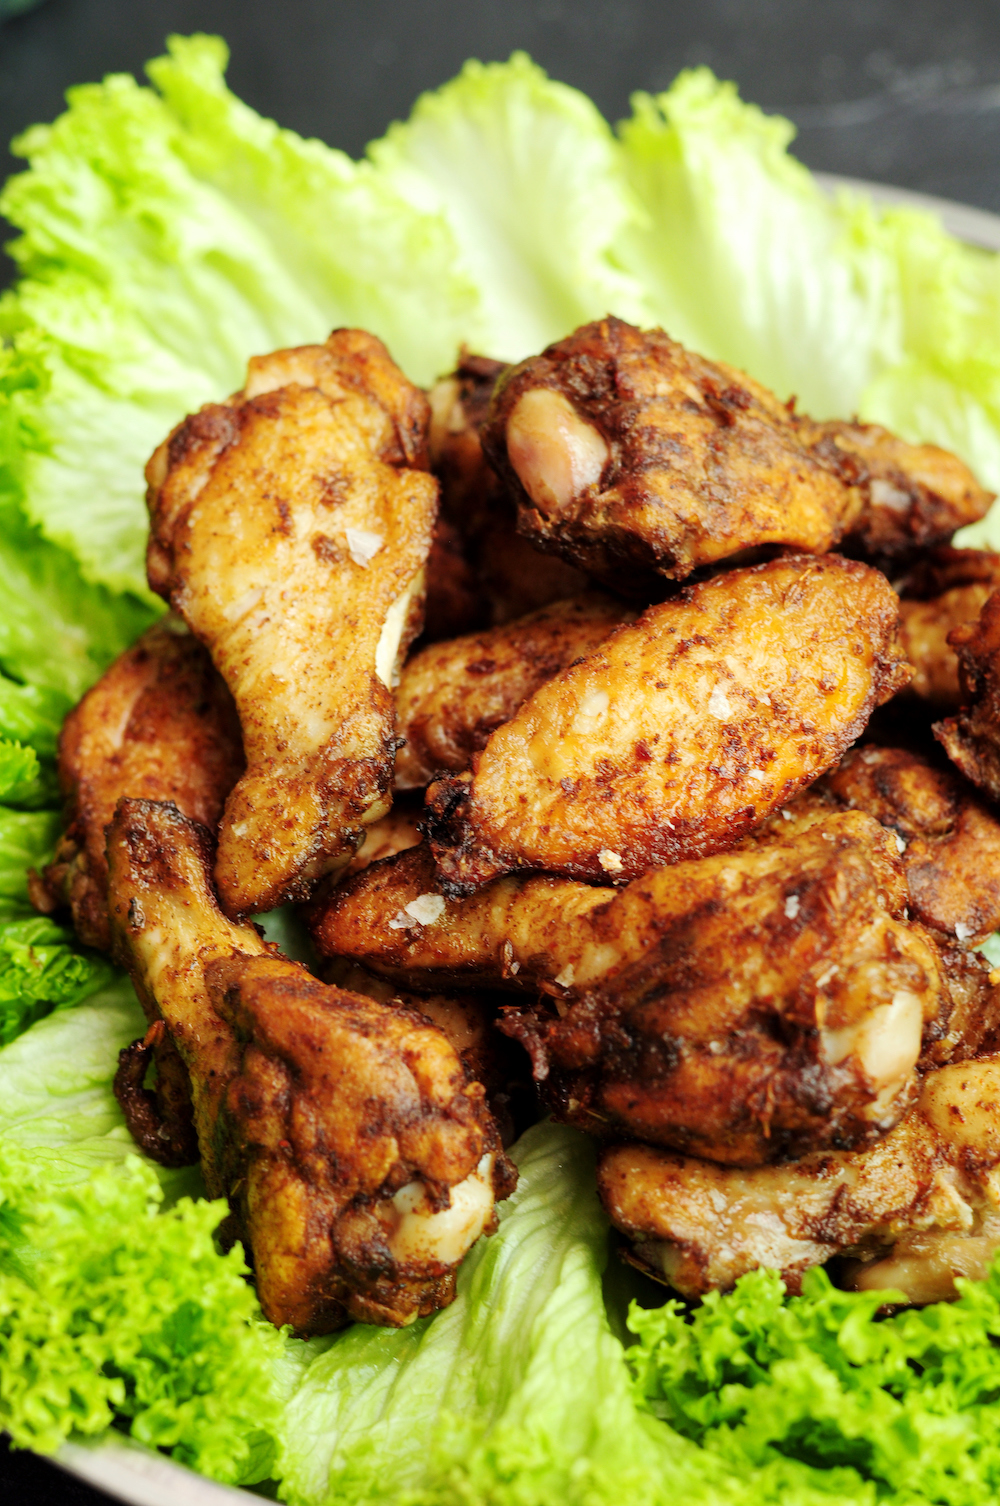
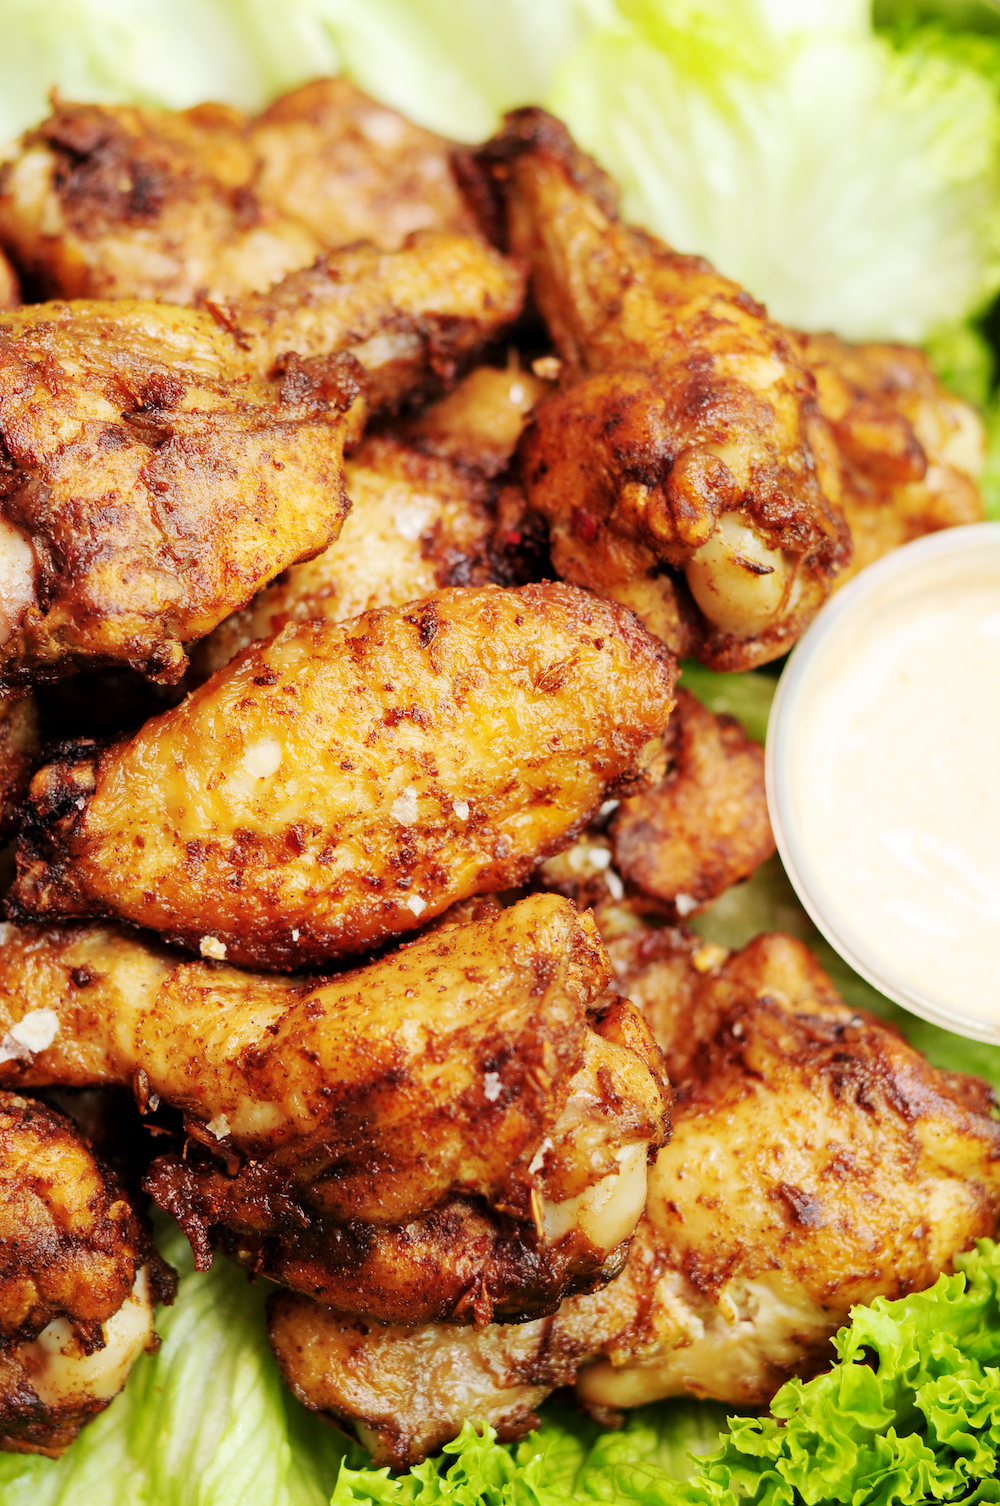
Best Ever Sous Vide Chicken Wings
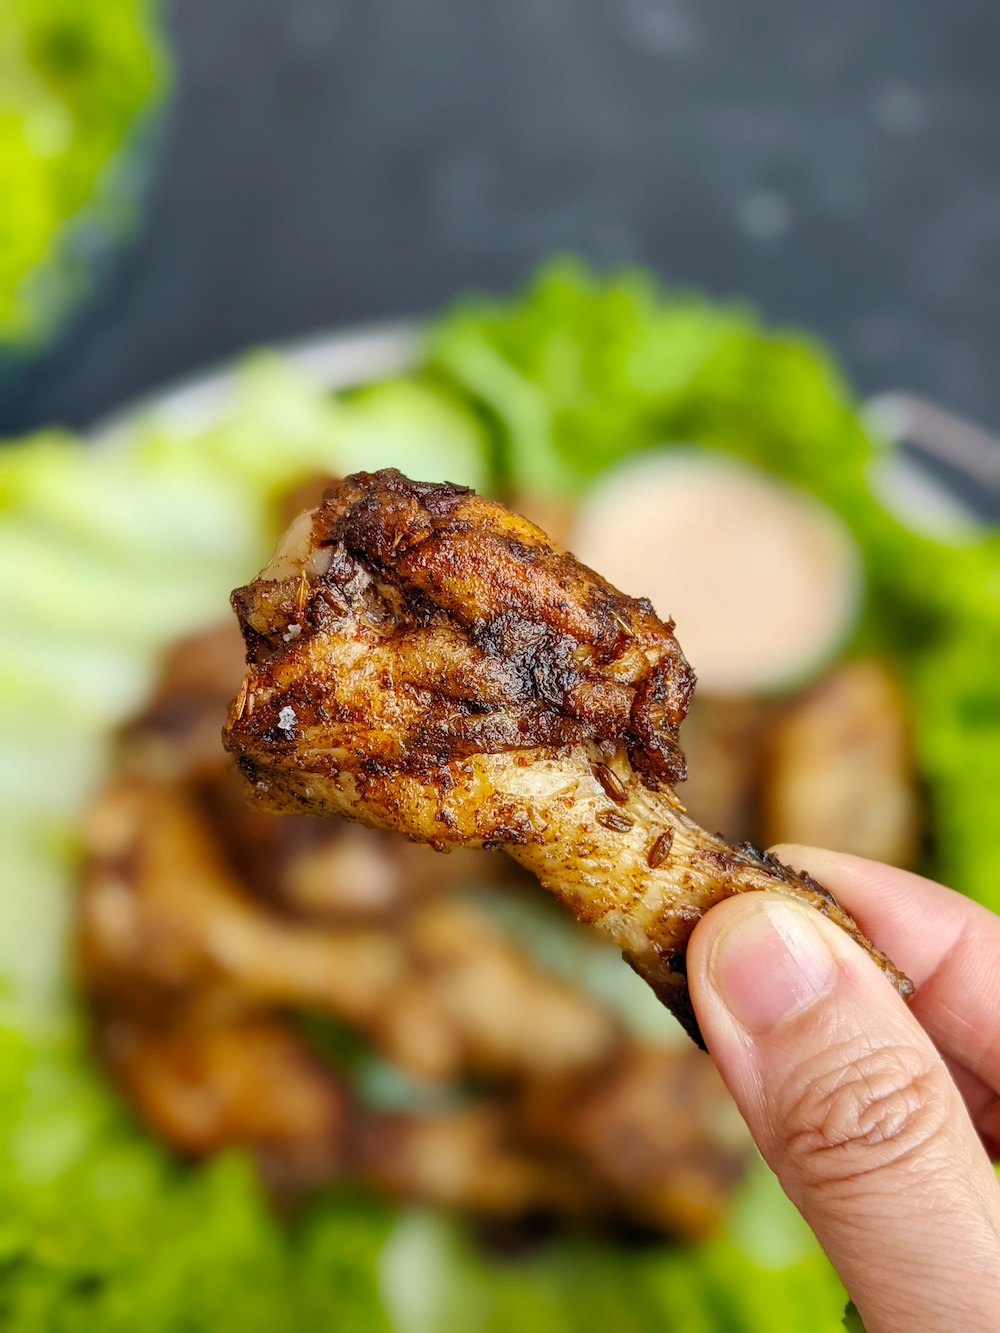
Sous vide chicken wings are by far the best way to melt the connective tissue in chicken wings and produce ultra-crispy, juicy, and tender wings every single time.
Best ever? Really? I know what you are thinking—this has gotta be an overstatement. After all, what can beat deep-fried chicken wings?!
Well, try to cook chicken wings sous vide and you’ll know it’s not an overstatement to call them the best ever!
Let me explain why.
Why Sous Vide Chicken Wings
Unlike other parts of a chicken, wings have a high ratio of skin to meat, which offers plenty of moisture and collagen-rich connective tissues at the joints. All of this makes chicken wings more forgiving, even if you cook them well done, especially with crispy skin.
That said, it’s easy to cook chicken wings past that well-done point because you don’t get that nice crunch on the outside unless your wings have contact with some intensely high heat. With traditional cooking methods, that amount of heat is pretty much guaranteed to have an impact on the meat inside, drying it out quickly, especially the drumettes, which are close to the chicken breast and more like white meat.
The sous vide method allows you to cook chicken wings at a low temperature, breaking down and melting the connective tissues while tenderizing the meat at the same time. Due to the relatively long cooking time at a much lower temperature, your chicken wings will not only be fully pasteurized but come out incredibly moist and juicy.
OK, great! What about the skin? you ask. That is why, my friend, you’ll need to cook the wings for the second time because crisping doesn’t happen in a plastic bag full of chicken juice. You want to let your wings dry completely before putting them in contact with high heat for the perfect golden brown crunch! That brings me to my next point.
Are There Any Downsides to Cooking Chicken Wings Sous Vide?
It takes a long time!
Firstly, the wings will swim in a water bath for one or two hours depending on the texture you are looking for. More on this later.
Secondly, you need to air-dry the wings for around eight hours in the fridge to ensure the best crisping result during the finishing stage. (There are many ways to finish your sous vide chicken wings. We’ll be frying them in this recipe.)
Finally, fry them.
You see, compared to Baked Chicken Wings, which you can do in less than an hour, making sous vide chicken wings takes much longer. It’s worth noting, though, that most of the hours are easy, hands-off time.
However, the same downside might work to your advantage if you are planning ahead. With a little time management, you can save a lot of hassle and mental energy and still get the best wings ever! After all, the best thing about sous vide cooking is that it guarantees the result. You’ll find make-ahead tips later in the article.
How Long to Sous Vide Chicken Wings and at What Temperature?
There are typically two temperatures for sous vide chicken wings, and they produce different textures.
| Temperature | Time | Texture |
| 160°F (71°C) | 2 hours | Fall-off-the-bone tender while remaining juicy |
| 165°F (74°F) | 1 hour | Juiciest and most tender with a little springiness |
Sous Vide Chicken Wings from Frozen
You can totally throw frozen chicken wings directly into the sous vide if you are short on prep time. Just make sure to bag them in a single layer and add 30-45 minutes of cook time. You can season your wings before taking the finishing steps.
Personally, I prefer to season fresh or defrosted wings with a little salt and pepper first and pack them up in several bags, then freeze them. This way you don’t sacrifice anything by cooking straight from frozen.
What You Need to Make Sous Vide Chicken Wings
Ingredients
- Chicken wings: Mostly wingettes and drumettes or a combination of both. If you use whole wings, cut off the tips and discard them or make a stock with them.
- Salt and pepper: A little salt and pepper go a long way.
- Cooking oil: To finish on the stove, you’ll need a good amount of cooking oil with a high smoke point for frying.
- Sauce of your choice: For example, buffalo sauce, bbq sauce, blue cheese sauce, chipotle ranch, etc.
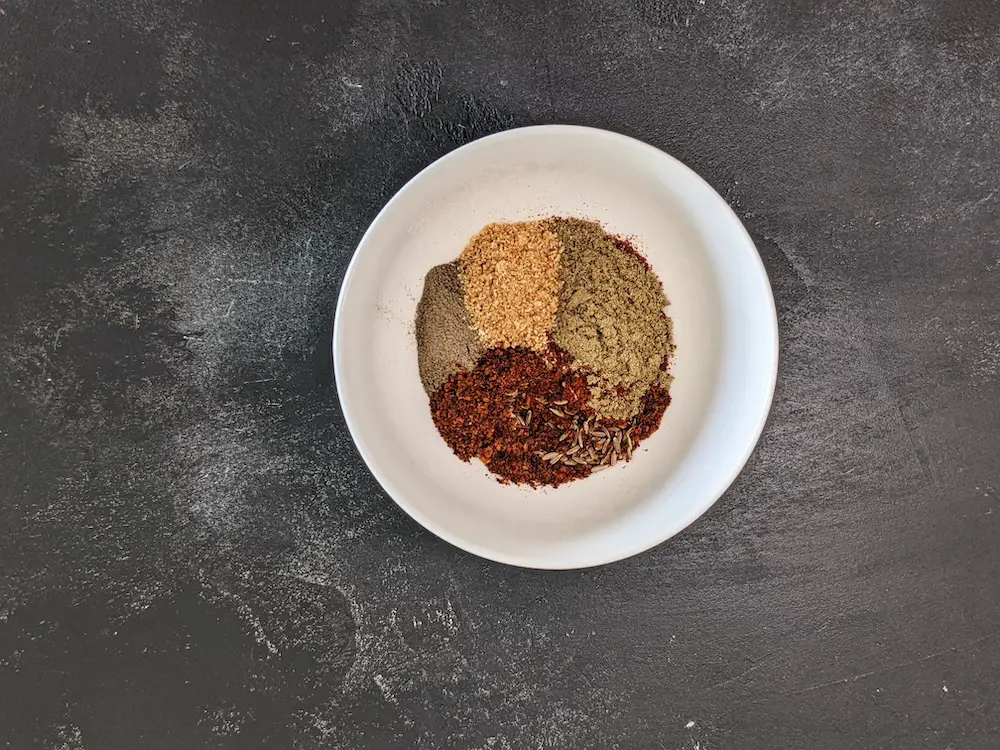
In this recipe, I went an extra mile for the seasonings, and I call it the Best Ever Wing Seasoning Mix. Trust me—it’s worth the little extra effort, and I bet you’ve got everything in your pantry. You’ll need salt, smoked paprika, ground cumin, cumin seeds (optional), ground black pepper, garlic powder, and cayenne pepper.
Equipment
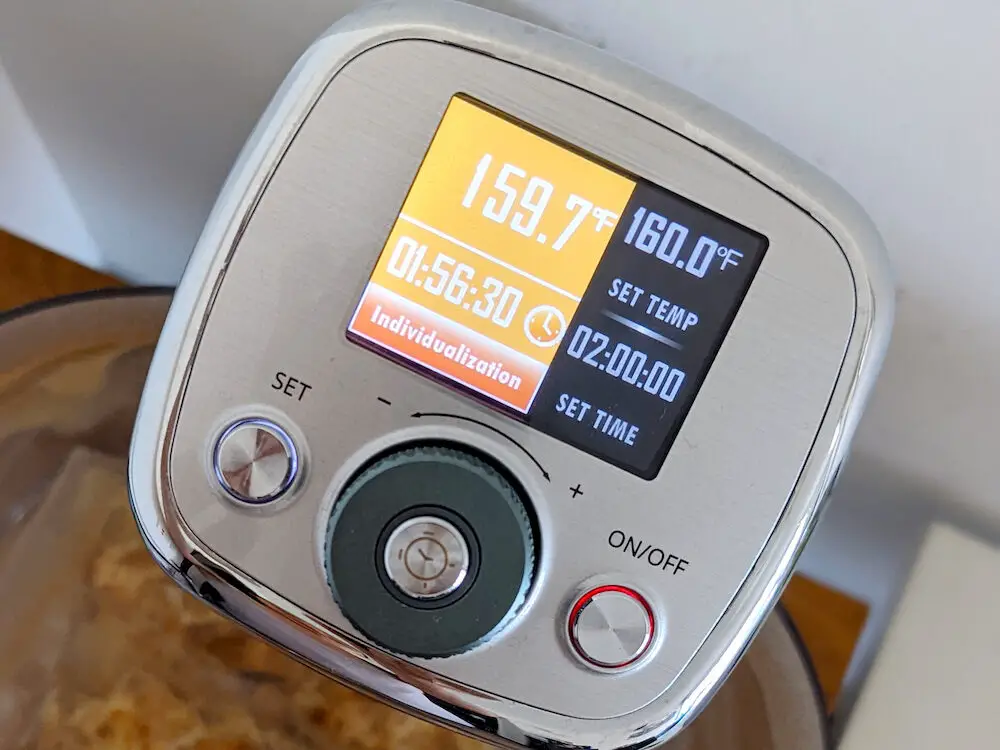
- A sous vide precision cooker. I used the KitchenBoss G320 Sous Vide Cooker for this recipe. To learn more about this particular product and see if it’s right for you, read my in-depth review here.
- A large pot or a sous vide container. This 12-quart container is compatible with most sous vide machines on the market.
- Vacuum sealer bags or Ziploc bags. Vacuum sealer bags would be recommended for making sous vide chicken wings.
- A vacuum sealer. I used the KitchenBoss Food Vacuum Sealer Machine. It’s one of these affordable machines that get the job done effectively. Use the water displacement method if you don’t have a vacuum sealer yet.
- Wire racks. For air-drying the wings in the fridge, it’s best to use wire cooling racks set over baking sheets so your wings have the maximum air circulation around them. If you don’t have multiple baking sheets or enough room in the fridge, depending upon the number of wings you make, the wings will still get dry enough sitting on plates in a single layer.
- A wok or a Dutch oven or a deep cast-iron skillet. For frying, one of these will work.
How to Sous Vide Chicken Wings Step by Step
Step 1: Set up the Sous Vide
Set up an immersion circulator and preheat the water to 160°F (71°C) or other desired temperatures. I used the KitchenBoss G320 sous vide cooker and set the timer for 2 hours.
Step 2: Prepare the Chicken Wings
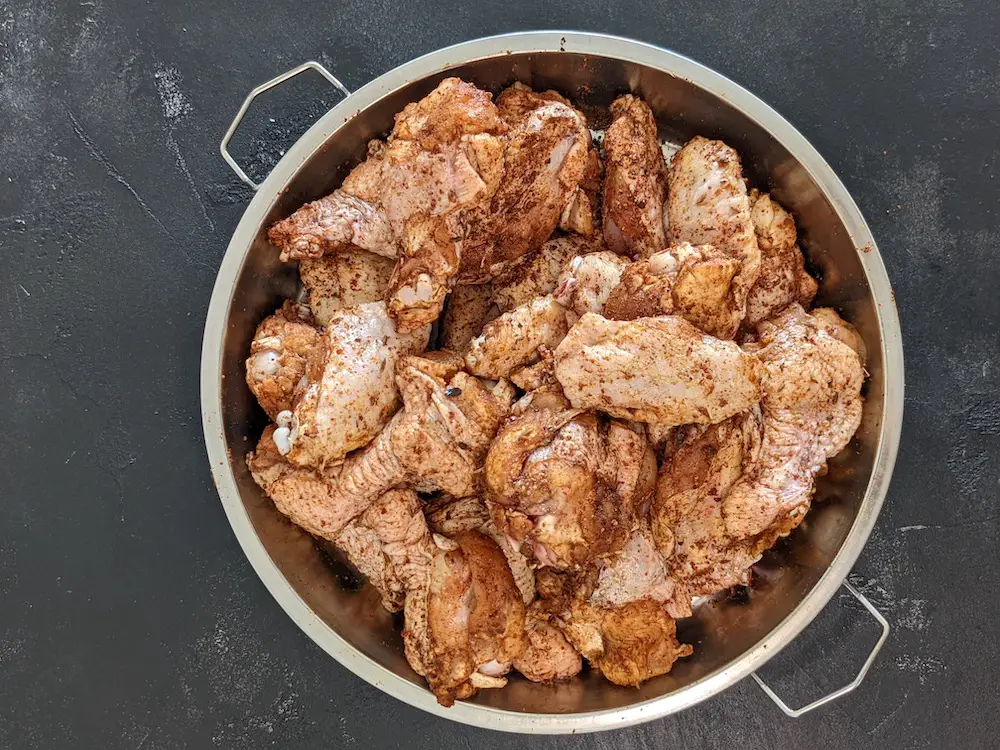
If using whole wings, separate them by cutting them into drumettes, wingettes, and wingtips. Save the tips for stock or discard them. Pat the wings dry with paper towels. Place them in a large mixing bowl.
Step 3: Make the Best Ever Wing Seasoning Mix
In a small bowl, combine salt, paprika, ground cumin, cumin seeds, black pepper, garlic powder, and cayenne pepper. Mix well.
Step 4: Season the Wings
Pour the seasonings into the mixing bowl and use both of your hands to coat the wings well.
Step 5: Bag the Wings
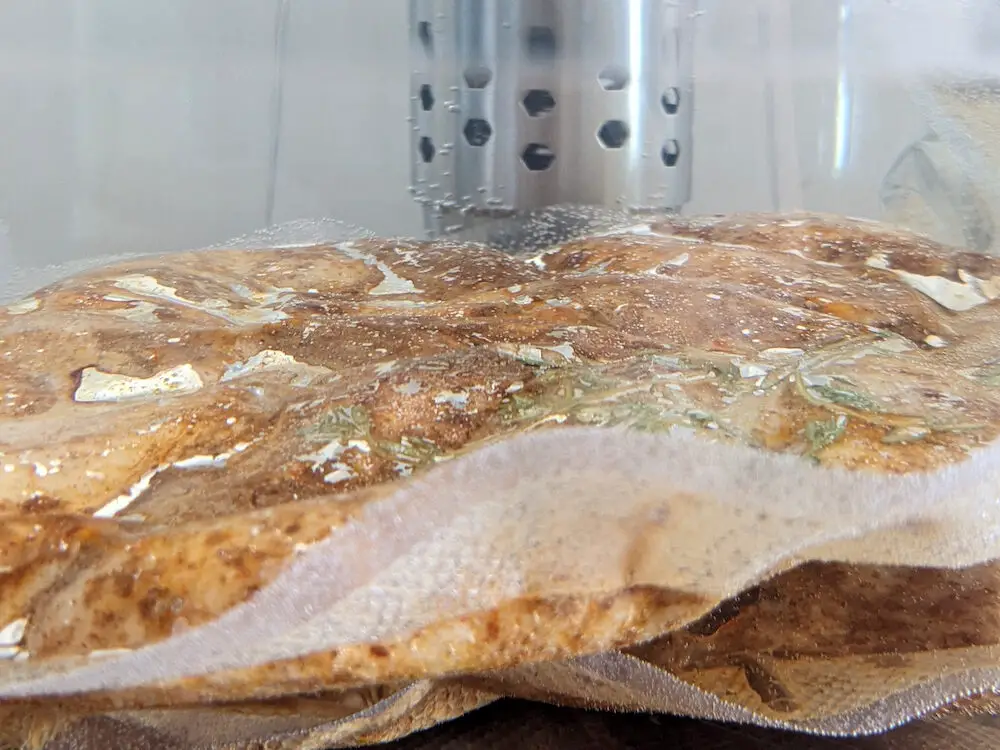
Prepare two large sous vide vacuum sealer bags or Ziploc bags. Place all wingettes in one bag and drumettes in the other. Arrange them in a single layer and vacuum seal or use the water displacement method to seal if using Ziploc bags.

Step 6: Sous Vide the Chicken Wings
Submerge the chicken wing bags in the preheated water bath.
Step 7: Air-Dry the Wings
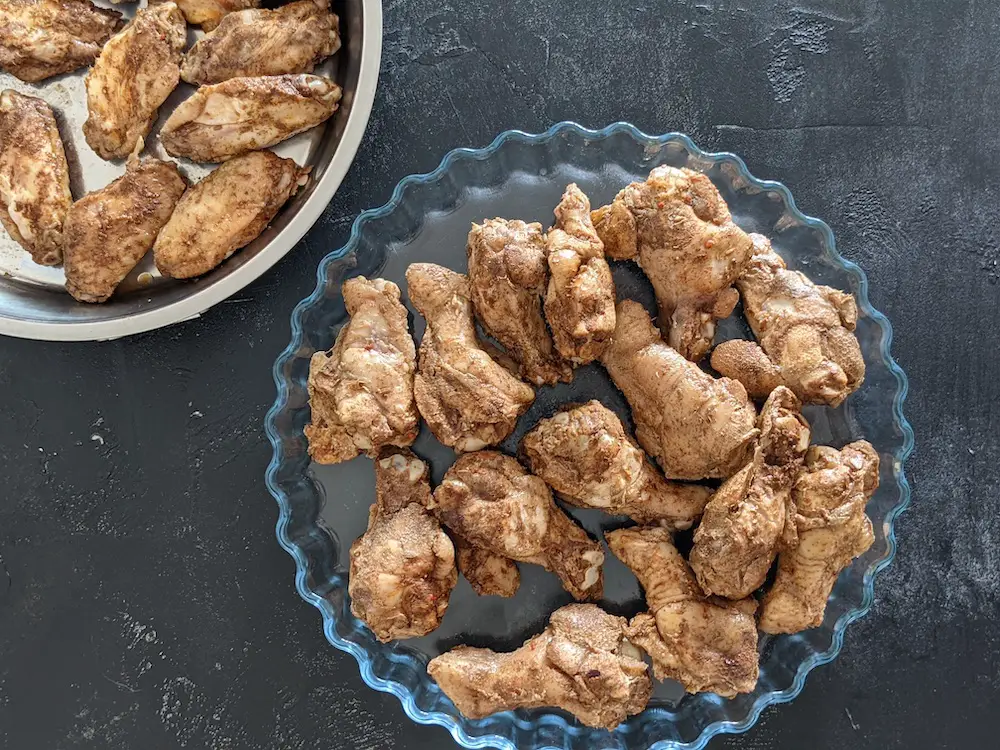
Once the wings are done, move them into an ice-water bath to chill rapidly. Open the bags and transfer the wings to a plate or baking sheet in a single layer. Pat them dry with paper towels as much as possible. Let them air-dry in the fridge without cover for a few hours, ideally overnight.
How to Finish Sous Vide Chicken Wings
Once your wings are completely dried, depending on what’s available in your kitchen, you have a few options to finish them to get that irresistibly crispy skin.
- Pan-fry them on the stove. Heat 2-3 inches of oil in a wok or Dutch oven until it reaches 400°F (205°C). Working in batches, carefully add the wings to the hot oil, and fry on each side until golden brown and crisp.
- Broil them in an oven. Adjust the oven rack to the highest level in the oven and heat the broiler to high heat. Broil the wings in a single layer for 5-6 minutes. Flip once halfway through the broiling time.
- Deep-fry them. If you have a dedicated deep fryer, preheat oil to 400°F (205°C), then fry the wings in batches for 3 minutes per batch.
- Grill them. Heat the grill to above 500°F (260°C). Remember to grease the grates beforehand. Place the wings in a single layer on the grates and grill each side for about 3-5 minutes until golden brown and crisp.
- Finish them in an air fryer. Toss your wings with a little oil, and fry at 400°F (205°F) for 12 minutes. Flip once halfway through the cooking time.
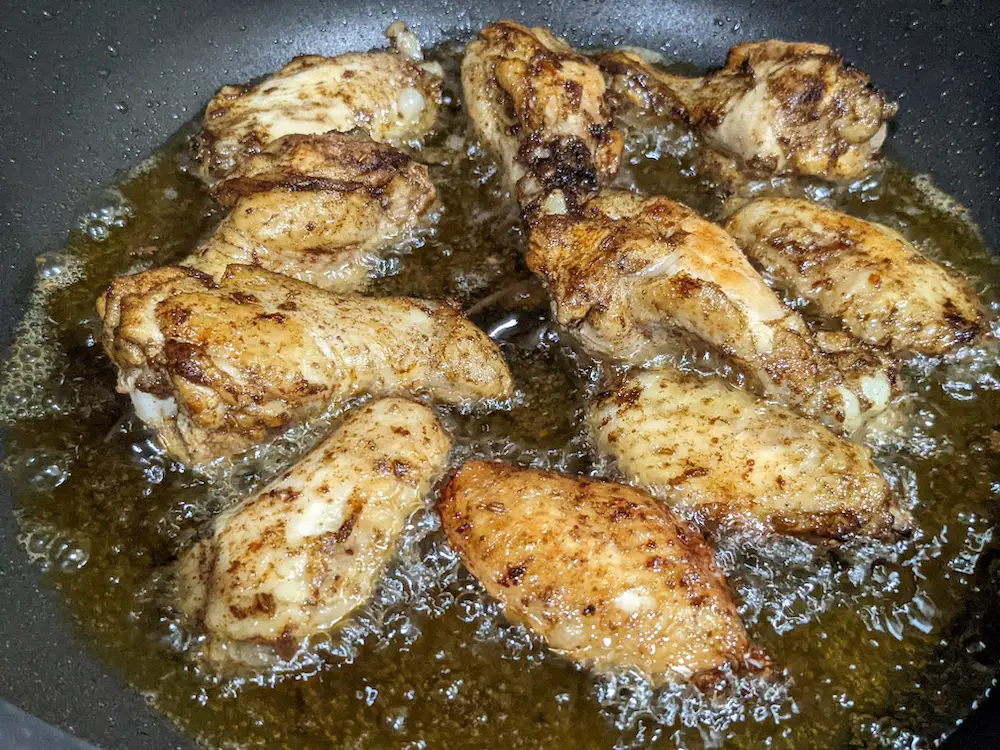
Personally, frying on the stove is my only choice, given that I have nothing else available in my tiny kitchen in Hong Kong at the moment. Apparently, it happens to be the most recommended method to finish sous vide chicken wings according to Serious Eats.
StreetSmart Sous Vide Tips
- Group wingettes and drumettes separately: When bagging your chicken wings for sous vide, make sure to separate the wingettes and drumettes. The different shapes of the wing parts will trap more air in the bags if you put them together, particularly if you don’t have a vacuum sealer and use the water displacement method to remove air.
- Cook in a single layer: This applies to both the sous vide stage and the finishing stage. In the sous vide, arranging the wing parts in a single layer ensures they cook evenly. When finishing, whichever finishing method you choose, cook the wings in a single layer and leave enough room in between each wing. This will ensure you get perfectly crispy skin all around.
- Chill rapidly: I recommend preparing an ice-water bath and submerging the chicken wings in it immediately after they are out of the sous vide bath. The sudden temperature change stops cooking right away and helps the meat to stay extra tender. The wings are also easy to handle after being chilled.
- Air-dry the wings: Chicken naturally produces quite a bit of juice after sous vide cooking. You could use paper towels to soak up as much of the liquid as possible if you plan to finish them shortly. Keep in mind that you’d be using A LOT of paper towels, and you won’t be able to remove the liquid completely that way. It’s highly likely that you’d experience spitting and splattering when frying the wings, and you’d need a longer time to crisp the skin, which ruins the positive effects of sous vide cooking the wings in the first place. Therefore, it’s highly recommended to let the wings air-dry in the fridge in a single layer (ideally on wire racks) without cover for eight hours or overnight. And this step fits perfectly with making the wings ahead of time.
Make-Ahead Steps
As I mentioned earlier, it’s easy to make chicken wings ahead of time using the sous vide method, especially when the game day approaches or there’s a gathering to host. Here are the simple steps to follow.
- A couple of days before serving day, season, bag, and sous vide the chicken wings. (You could also skip the seasoning and instead sous vide frozen chicken wings for 30-45 minutes longer than fresh wings.)
- Rapidly chill the chicken wings in an ice-water bath after cooking. Blot them dry with paper towels, then lay them in a single layer on large plates or on wire racks set over baking sheets. Place the wings in the fridge, uncovered, for at least eight hours.
- Once they are completely dry, if you don’t plan on finishing them soon, you can put them in a container and store them in the fridge for up to five days (including the drying time). You can finish the wings and serve them anytime within this five-day window.
There are a few other make-ahead options to consider:
- Season chicken wings and vacuum seal them to leave in the fridge until you are ready to sous vide. The uncooked chicken wings can be stored in the fridge for up to five days.
- Season chicken wings and vacuum seal them, then freeze. When you are ready to sous vide, no need to thaw; they can go directly into the sous vide bath. You just need to cook the frozen wings a little longer.
- After sous vide, you could store the cooked wings in their bags in the fridge for a couple of days if you don’t dry them on the day of cooking. However, keep in mind that you’ll need to use your hands to peel the gelified cooking juice off the wings before drying them.
- After sous vide, you could also freeze the cooked wings for up to six months. To serve, defrost them first, then follow the same steps to air dry, then finish them. The meat from the wings also makes a great appetizer. Hello, Three-Cheese Buffalo Chicken Nachos!
Here you have it, everything I have learned to make the best ever sous vide chicken wings. I hope you find the information in this article helpful, and please leave a comment below to share your sous vide experiences. I would love to hear how you like the wings! They are darn good in my book.
Print
Best Ever Sous Vide Chicken Wings
- Prep Time: 15 minutes
- Cook Time: 2 hours
- Total Time: 10 hours 30 minutes
- Yield: 4 servings 1x
- Category: Appetizer
- Method: Sous Vide
- Cuisine: American
- Diet: Gluten Free
Description
Sous vide chicken wings is by far the best way to melt the connective tissue in chicken wings and produce ultra-crispy, juicy, and tender wings every single time.
Ingredients
- 3 pounds of chicken wings (whole wings, wingettes, drumettes, or a mix of them)
- Cooking oil with a high smoke point
- Sauce or dressing of your choice
For the Best Ever Wing Seasoning Mix:
- 1 1/2 teaspoons sea salt
- 2 teaspoons smoked paprika
- 1 teaspoon ground cumin
- 1 teaspoon cumin seeds (or ground cumin)
- 1 teaspoon ground black pepper
- 1 teaspoon garlic powder
- 1 teaspoon cayenne pepper
Instructions
- Set up the sous vide: Set up an immersion circulator and preheat the water to 160°F (71°C) or other desired temperature. I used the KitchenBoss G320 sous vide cooker and set the timer for 2 hours.
- Prepare the chicken wings: If using whole wings, separate them by cutting into drumettes, wingettes, and wing tips. Save the tips for stock or discard them. Pat the wings dry with paper towels. Place them in a large mixing bowl.
- Mix the seasonings: In a small bowl, combine salt, paprika, ground cumin, cumin seeds, black pepper, garlic powder, and cayenne pepper. Mix well.
- Coat the wings: Pour the seasonings into the mixing bowl and use both of your hands to coat the wings well.
- Bag the wings: Prepare two large sous vide vacuum sealer bags or Ziploc bags. Place all wingettes in one bag and drumettes in the other. Arrange them in a single layer and vacuum seal or use the water displacement method to seal if using Ziploc bags.
- Sous vide the chicken wings: Submerge the chicken wing bags in the preheated water bath.
- Air-dry the wings: Once the wings are done, move them into an ice-water bath to chill rapidly. Open the bags and transfer the wings to a plate or baking sheet in a single layer. Pat them dry with paper towels as much as possible. Let them air-dry in the fridge without cover for a few hours, ideally overnight.
- Finish: Add 2-3 inches of cooking oil to a wok or Dutch oven and heat the oil until a drop of water sizzles when it lands or to 400°F (205°C). Working in batches, use tongs to carefully place the dried wings in the hot oil. Don’t overcrowd the wok or Dutch oven. Fry each side for about 90 seconds, flipping occasionally until golden brown and crisp. Transfer the wings to a plate lined with paper towels to drain.
- Serve: Dip the wings in your preferred sauce and enjoy!
Notes
Recipe adapted from Complete Sous Vide Cookbook: 150+ Recipes for Perfect Meat, Seafood, Vegetables, and More by yours truly.
Nutrition
- Serving Size: 1
- Calories: 441
- Sodium: 278.8mg
- Fat: 12.5g
- Saturated Fat: 3.3g
- Trans Fat: 0.2g
- Carbohydrates: 2.3g
- Fiber: 0.8g
- Protein: 75.3g
- Cholesterol: 193.9mg
About the Author

Sharon Chen is an Integrative Nutrition Health Coach and author of the Complete Sous Vide Cookbook. She believes food not only brings healing but also connection. As the creator of StreetSmart Kitchen, she aims to make meal prep easier than ever and help you find balance, ease, joy, and simplicity in the kitchen as you improve your well-being.

These sous vide chicken wings look absolutely amazing! I love how you’ve broken down the process so clearly. Can’t wait to try your tips and perfect my wing game at the next gathering! Thanks for sharing!
Meat looks perfectly cooked and so delicious. I can’t wait to give your recipe a try. That seasoning mix sounds perfect! Thanks, I’m saving the recipe right now.
Wow this iperfect we just love wings and always looking for new recipes cant wait to try this!
I just ordered a Sous Vide cooker. Can’t wait to try this recipe out!
I absolutely love making chicken wings in the sous vide. It makes them so tender and delicious. Thanks for the great recipe!
Wow, I wouldn’t have thought of sous-vide-ing chicken wings, but these are amazing – so succulent and tender.