Game-Changing Sous Vide Cheesecake in Jars
Sous vide cheesecake in jars is the easiest and most foolproof way to make the perfect cheesecake consistently without cracks or hassle.
Recently, someone asked me what the last meal of my life would be if I got to choose it. I was not able to answer that question right on the spot because…well, there are so many options. Over the following days, I gave the question some serious thought but found myself changing the main course over and over again. The only thing that remains unchanged on the menu of my last meal is dessert—the good old cheesecake!
The classic New York-style cheesecake is a very delicate dessert to make in a traditional way. It requires a lot of practice and experience to get it right when making it at home. Therefore, it is intimidating for a lot of us home cooks.
However, sous vide cheesecake is a total game-changer. It’s hands-down the easiest and most foolproof way to make the best cheesecake ever! Let me show you why and how along with everything you need to know about these individual-serving cheesecakes.
- Why Sous Vide Cooking Cheesecake Works
- Time and Temperature
- What You Need to Make Sous Vide Cheesecake
- How to Make Sous Vide Cheesecake Step by Step
- How to Serve Sous Vide Cheesecake in Jars
- Crust on Top or at the Bottom?
- Other Topping Ideas
- How Long Does Sous Vide Cheesecake Last?
- StreetSmart Sous Vide Tips
- Game-Changing Sous Vide Cheesecake Recipe
- About the Author
Why Sous Vide Cooking Cheesecake Works
Sous vide cheesecake doesn’t just work, it works so darn well that I can’t think of a better way to make infallible cheesecake like this!
- When you bake cheesecake in an oven, the temperature varies depending on your oven model or even your altitude. That’s precisely why homemade traditional cheesecake often cracks. Sous vide cooking, on the contrary, holds a precise temperature during cooking, which gives you full control. It makes the smoothest and creamiest cheesecake with your desired consistency every single time. No more cracked cheesecake, no more overcooking or undercooking, simply perfect!
- Cooking cheesecake in jars transforms a whole cake into individual servings; you’ll be able to know and track your calorie, cholesterol, and carbohydrate intake on a more granular level. It also means this heavenly dessert is easier to share.
- You can make the cheesecakes ahead of time and let them chill in the fridge until you are ready to serve.
- It makes a wonderful gift, especially when you have a hard time coming up with a gift idea. Cheesecake will never, ever go wrong!
Time and Temperature
You can sous vide cheesecake between 176°F (80°C) to 185°F (85°C). The higher the temperature, the firmer the cheesecake gets. I encourage you to experiment until you find the texture you like the most.
Based on my experience and my preferences, the best temperature for sous vide cheesecake is 176°F (80°C) for 90 minutes.
What You Need to Make Sous Vide Cheesecake
Ingredients
- Cream cheese. Make sure to use the block of cream cheese. Full-fat cream cheese is recommended as it produces a silky smooth texture. If you use reduced-fat cream cheese, it will work, but keep in mind that the texture will be a little different. Let the cream cheese soften before mixing.
- Granulated sugar. Use regular granulated white sugar.
- Large eggs. Room-temperature eggs can blend more easily, but it’s not mission-critical if you use eggs straight out of the fridge.
- Sour cream or buttermilk. Some people use buttermilk, but I personally like to add low-fat sour cream to the filling.
- Vanilla extract.
- Salt. Salt enhances flavors and balances the richness and sweetness of the cheesecake.
- Lemon juice. This is optional. I found that adding a splash of lemon juice enhances the tangy flavor nicely.
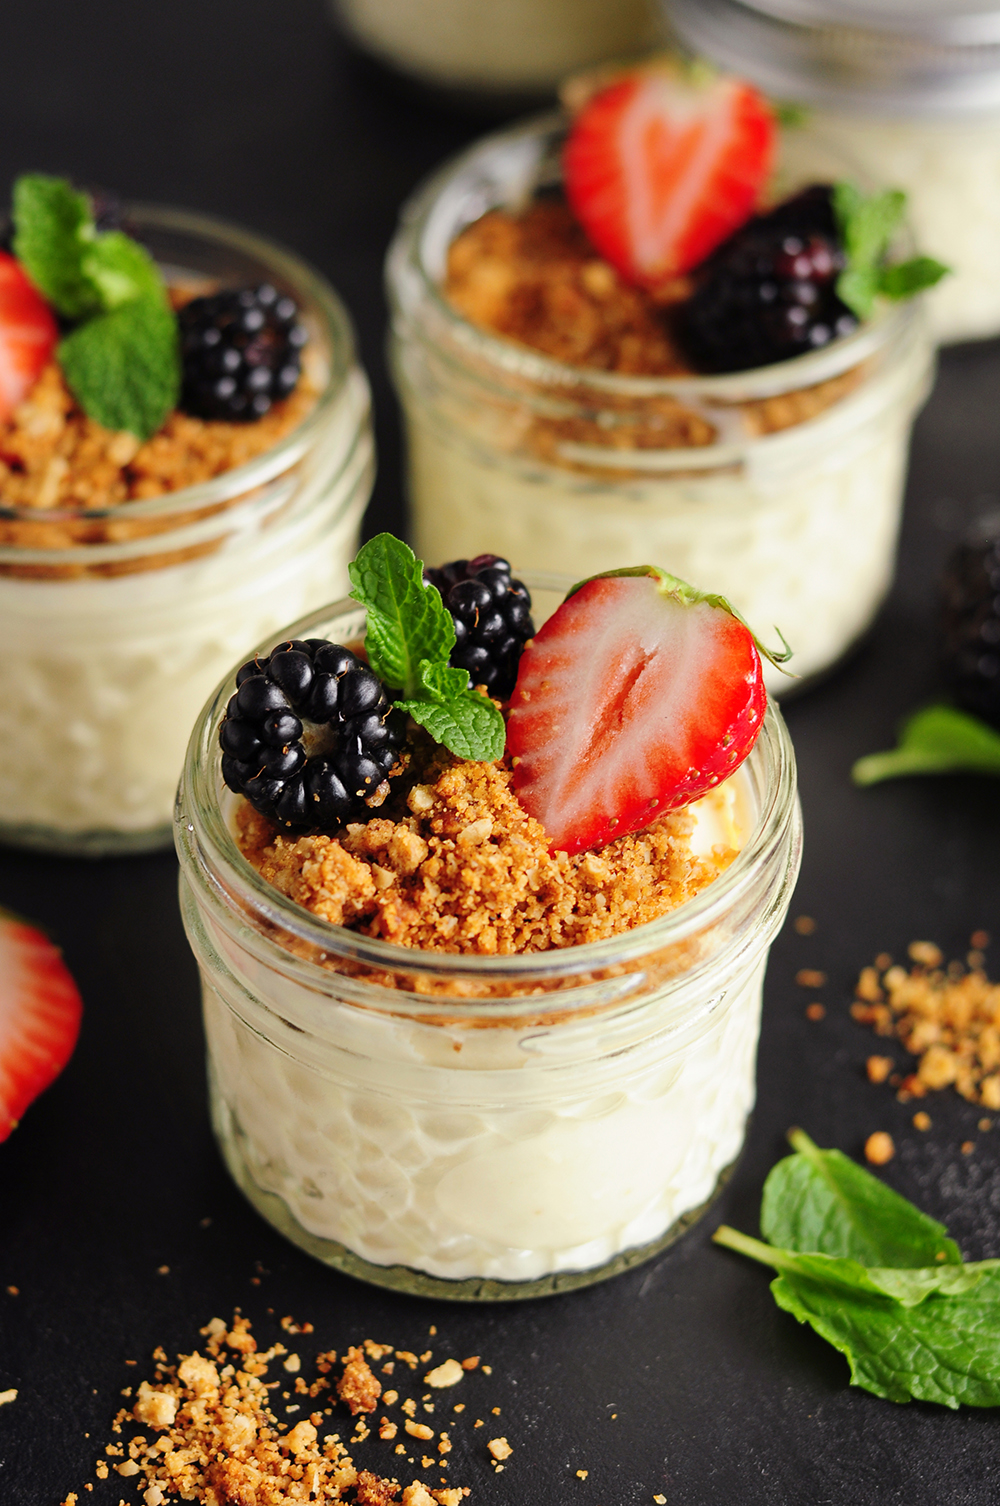
- Graham crackers. Graham cracker crust is usually everyone’s go-to. But a very good alternative is any kind of digestive biscuits, which is what I used in this recipe.
- Butter. Melted butter binds the crumbles together. Either unsalted butter or salted butter will work.
- Ground cinnamon. Simply delicious.

Equipment
- A sous vide precision cooker. I used the KitchenBoss G320 Sous Vide Cooker for this recipe. To learn more about this particular product and see if it’s right for you, read my in-depth review here.
- A sous vide container or a large pot.
- 4-ounce mason jars/canning jars. I used VERONES mason jars to make the cheesecakes. These little jars are perfect for sous vide, and they also come with an extra set of lids.
- A stand mixer or a hand mixer. If you have a stand mixer, by all means, use that. If not, a hand mixer can do the job just as efficiently.
- Tongs. This stainless steel kitchen tong set is my favorite.
How to Make Sous Vide Cheesecake Step by Step
Now, let’s get down to business! Follow the steps and watch the recipe video to make the best individual servings of cheesecake.
- Heat a sous vide bath to 176°F (80°C) or to the temperature you prefer. Set the timer.
- Make the cheesecake filling: Using a stand mixer or hand mixer, beat the softened cream cheese with sugar until smooth and slightly fluffy. Beat in the eggs, one at a time. Then add sour cream, vanilla extract, salt, and lemon juice. Beat until the cheesecake filling mixture reaches an even consistency without any lumps.
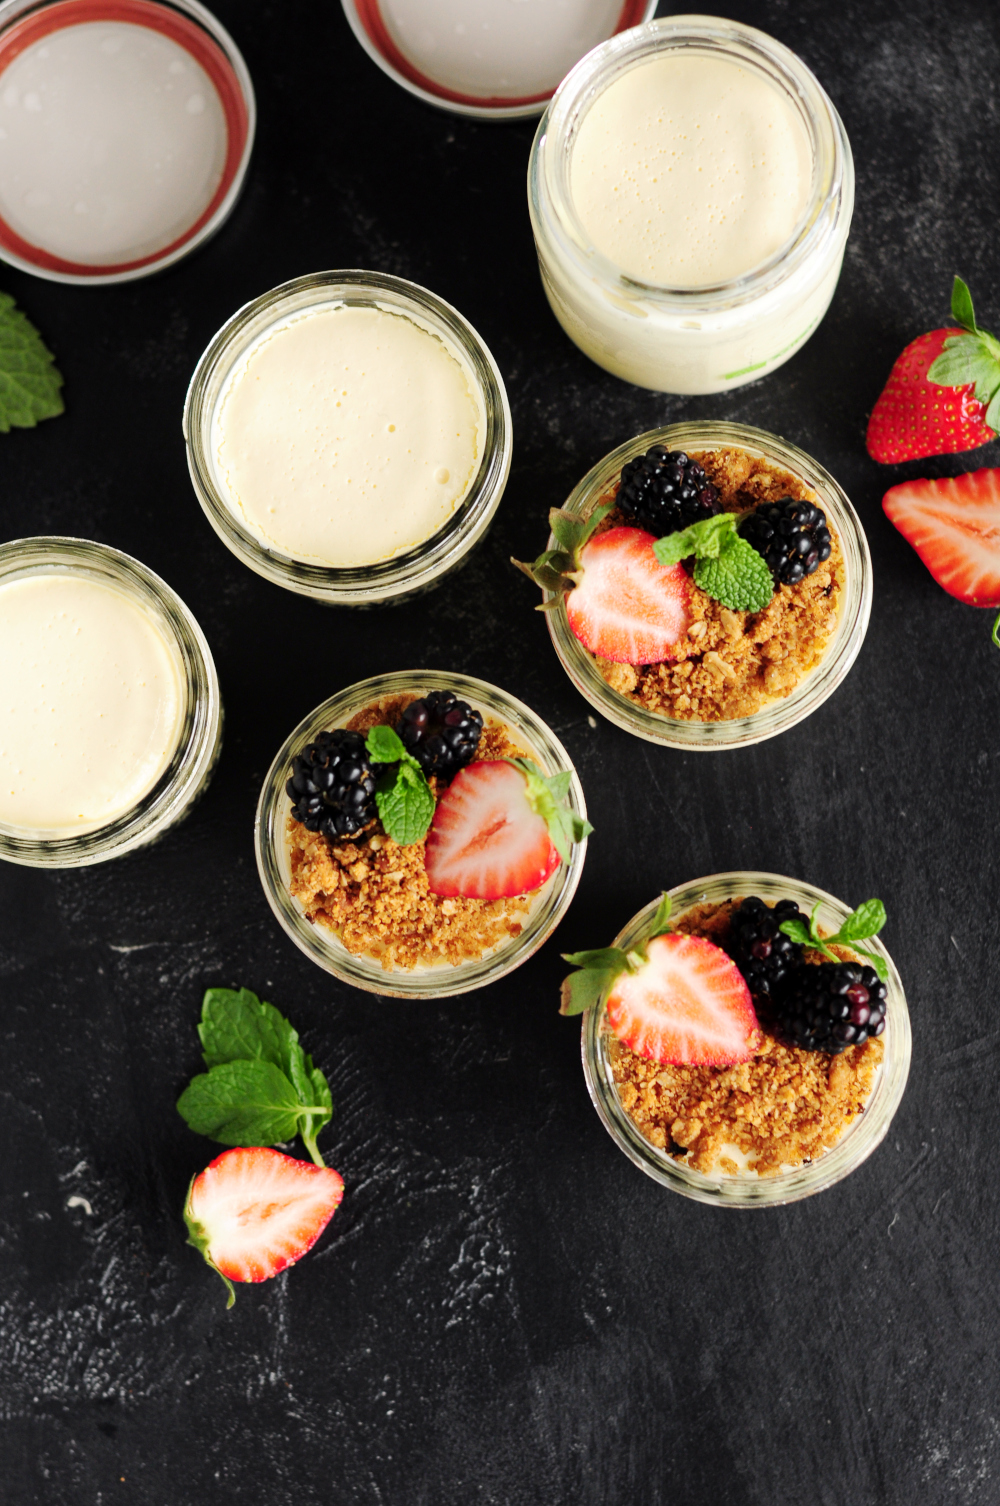
- Fill in the jars and seal fingertip tight: Scoop the cheesecake batter into 4-oz jars leaving 1 1/2 inches of room at the top of each jar. Tap the bottom of the jars a few times against your kitchen countertop to shake out as much air as possible from the mixture. Seal the jars tightly with your fingers only. Air needs to come out of the jars while cooking. If you seal them too tightly, they will crack.
- Put the jars in the sous vide water bath to cook: Carefully lower the jars in the sous vide bath using tongs and set the timer for 90 minutes. If your water bath hasn’t reached the set temperature by this point, it’s perfectly fine. In fact, it’s preferred since warming up the jars slowly will prevent them from cracking.
- Make the crust: While the cheesecake is cooking, crumble graham crackers in a food processor or put them in a Ziploc bag and crumble them with a rolling pin. Melt butter over medium-low heat in a skillet. Add the graham cracker crumbs and combine well. Stir in ground cinnamon. Remove from heat and let the crust mixture cool to room temperature.
- Make the desired toppings (optional): For ideas, read on.
How to Serve Sous Vide Cheesecake in Jars
Crust on Top or at the Bottom?
Traditionally, cheesecakes have this lovely layer of crust sitting at the bottom. About half of the sous vide cheesecake recipes on the internet suggest putting the crust ingredients at the bottom of the jars before adding the filling to recreate the traditional cheesecake form.
However, I vote for the crust on top for sous vide cheesecakes in jars. Here’s why.
- Because the cheesecake is served in a jar, it’s likely that your first couple of scoops with a spoon won’t even reach the bottom of the jar if the crust sits at the bottom, especially if you use bigger jars.
- When putting the crust, aka the crumbs, on top as you serve, it stays fresh and crunchy, which gives a nice texture contrast. You have the flexibility to add more as you go through the jar.
- No soggy crust even if you leave the cheesecake in the fridge for a few days.
- Making the crust while the cheesecake cooks saves time. If you want the crust to be at the bottom of the jars, you’d have to make the crust and let it cool before adding it to the bottom of the jars. Then do the cheesecake filling. It’s just less efficient in my book.
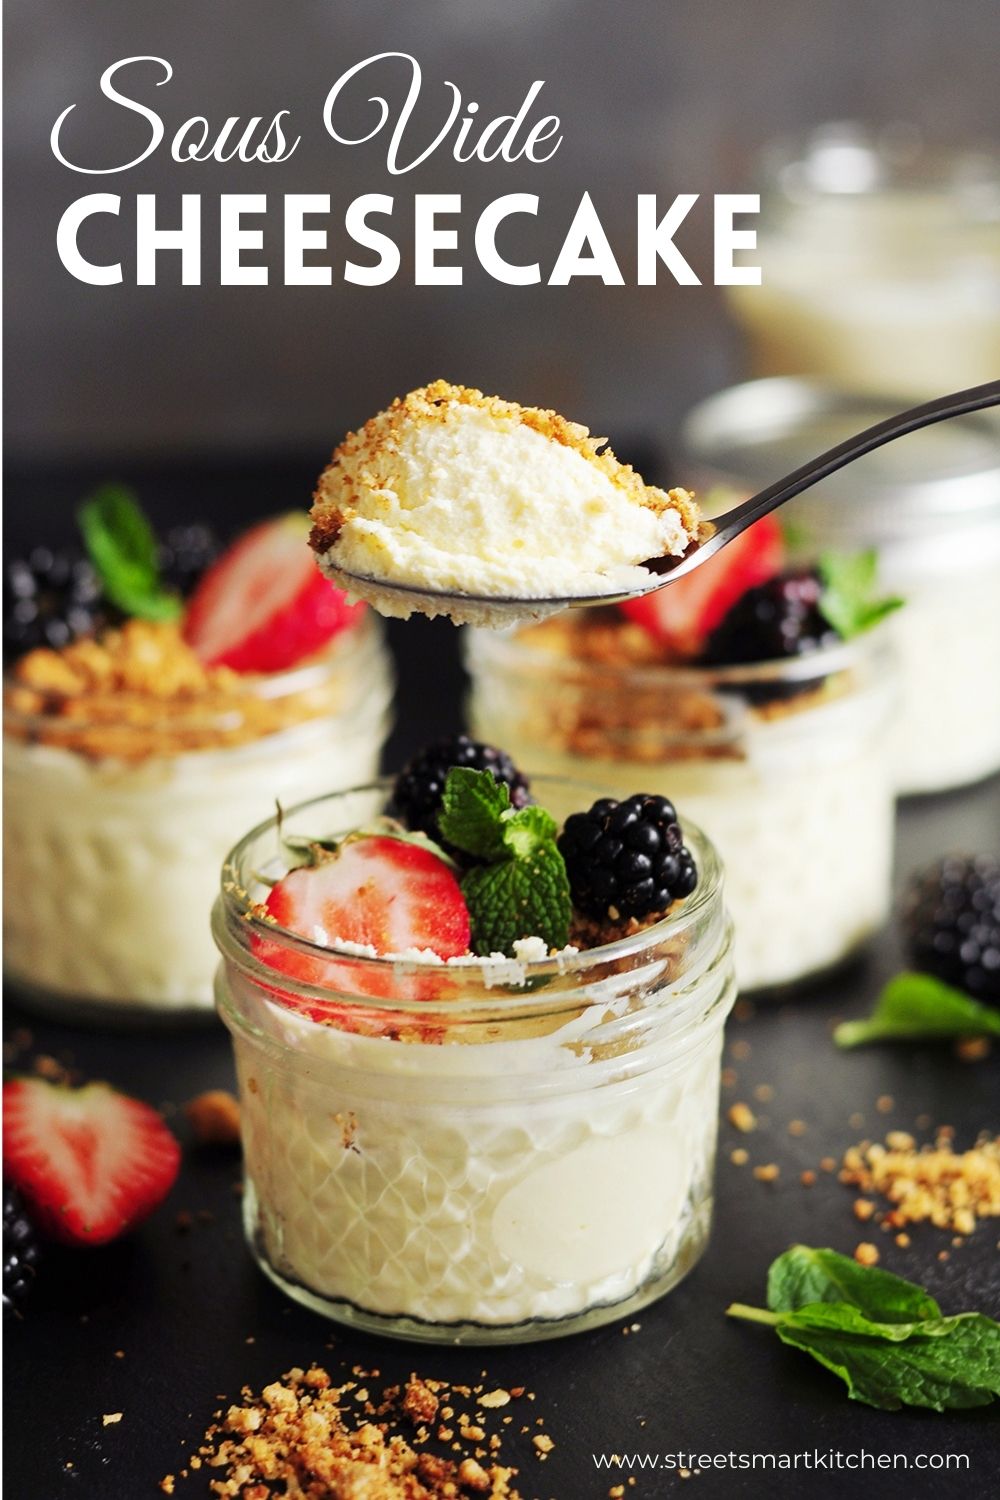
Other Topping Ideas
Well, the crust on top sort of serves as a topping already. But we don’t want to stop here, do we? Let’s explore some other topping ideas for your cheesecake jars.
- Fresh fruit with fresh mint leaves for garnishing
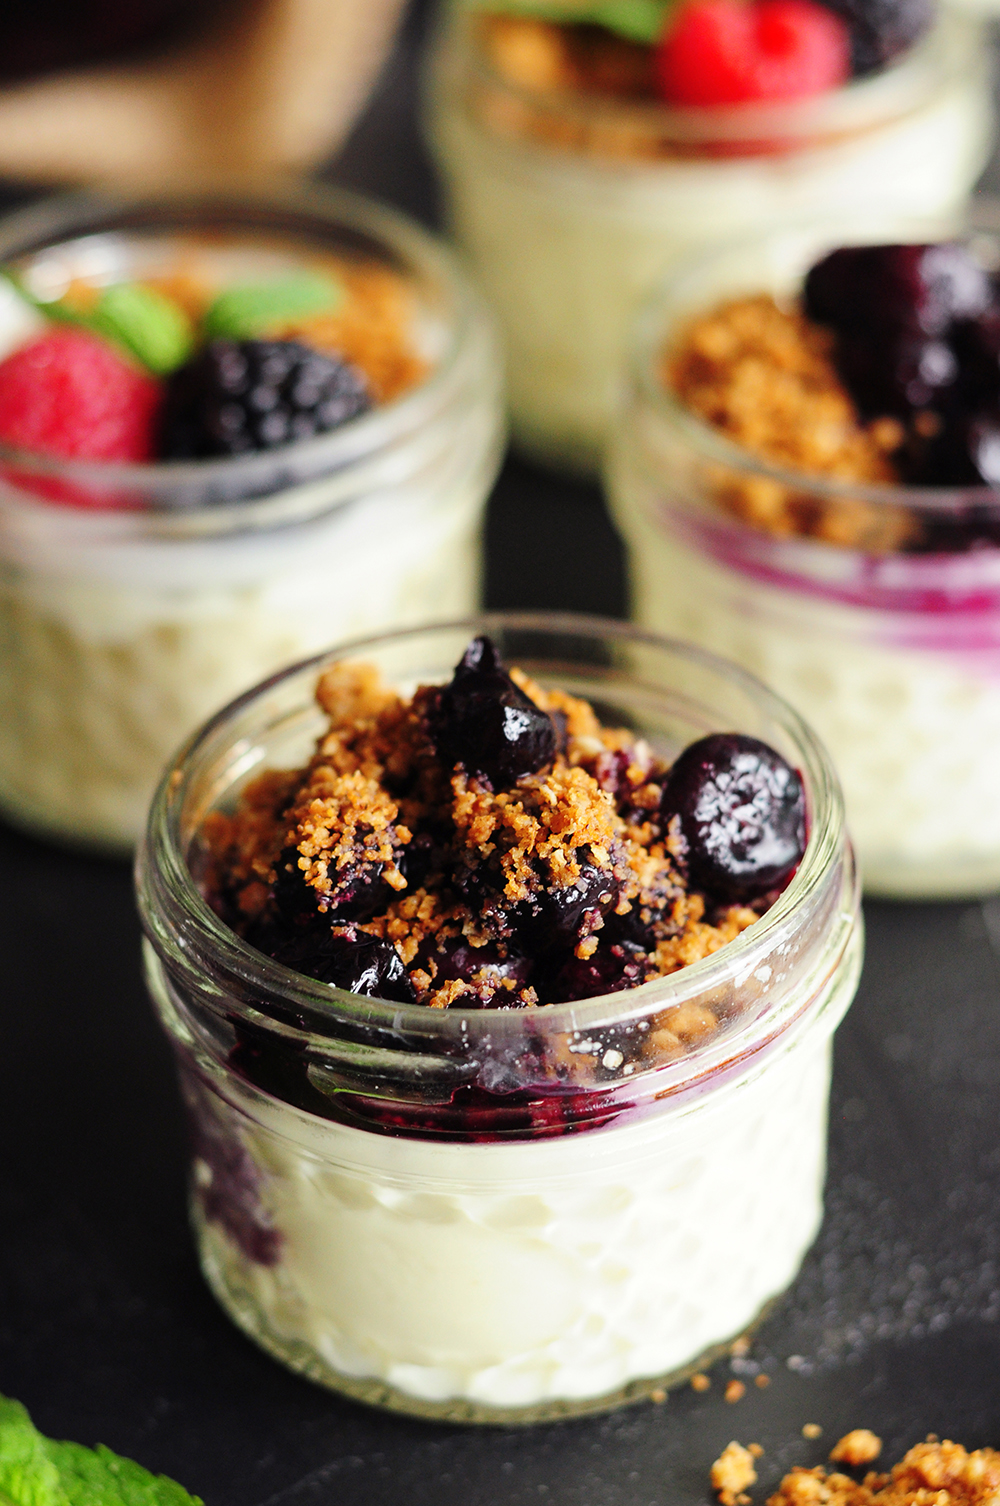
- Blueberry toppings. See how to make it in the recipe below and the same method can be used for…
- Strawberry toppings or mixed berry toppings
- Crushed Oreo cookies
- Chocolate sauce
- Whipped cream
- Crumbled brownies. Oh my lord! This idea reminds me of this Brownie Cheesecake!

How Long Does Sous Vide Cheesecake Last?
Unopened jars of cheesecake can be stored in the fridge for up to seven days. They’ll most likely be long gone before you know it.
You can also freeze sous vide cheesecake for up to three months. Thaw in the fridge overnight before serving.
In both storage cases, make sure the jars are sealed and no toppings are added.
StreetSmart Sous Vide Tips
- Soften the cream cheese and bring the eggs to room temperature. Leave the cream cheese blocks and eggs out of the fridge on the kitchen counter for an hour or two. You should be able to feel the softness with a gentle squeeze. This will help it blend easily without lumps.
- Get rid of the air from the filled jars by tapping the bottoms of them against the kitchen countertop lined with a kitchen towel. It will make your cheesecake smoother and at the same time, prevent the jars from cracking in the sous vide bath.
- Only seal the jars fingertip tight. Do not use the strength of your full palm to seal too tightly. Air does need to be released during cooking. Otherwise, your jars might crack.
- One more thing you can do to prevent the jars from cracking is to place the jars in the sous vide bath before the water reaches the set temperature. You can even let the jars settle in water before turning on the sous vide machine.
- Let the cheesecake cool to room temperature after cooking and refrigerate for at least four hours before serving. The chilling process will allow the cheesecake to set completely for the best result. Some suggest opening the jars to cool faster and patting dry the moisture from the lids, then putting the lids back on before moving into the fridge. Personally, once my jars are sealed, I don’t open them until it’s serving time to minimize air or potential bacteria getting into the jars. Cheesecakes can last longer in the fridge if unopened.
That’s all. I hope the information in this article is sufficient for you to make the best sous vide cheesecake in your own kitchen. It’s a total game-changer! If you have any questions or suggestions, feel free to leave a comment below.
Print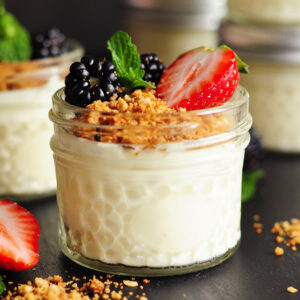
Game-Changing Sous Vide Cheesecake Recipe
- Prep Time: 20 minutes
- Cook Time: 1 hour 30 minutes
- Total Time: 1 hour 50 minutes
- Yield: 9 4-oz Jars of Cheesecake 1x
- Category: Dessert
- Method: Sous Vide
- Cuisine: American
- Diet: Gluten Free
Description
Sous vide cheesecake in jars is the easiest and most foolproof way to make the perfect cheesecake consistently without cracks or hassle. These individual servings of cheesecake can be made ahead of time and have endless topping options to go with.
Ingredients
For the Cheesecake:
- 16 ounces cream cheese, softened
- 1/3 cup sugar, granulated
- 2 large eggs
- 1/2 cup sour cream (I used a 47% less fat one)
- 1 teaspoon vanilla extract
- 1/2 teaspoon salt
- 1 teaspoon lemon juice
For the Crust:
- 1 tablespoon unsalted butter
- 1 cup crumbled graham crackers or digestive biscuits
- 1/2 teaspoon ground cinnamon
For the Blueberry Topping:
- 2 cups frozen blueberries
- 2 tablespoons granulated sugar
- 1 tablespoon lemon juice
Instructions
- Heat water to 176°F (80°C) using a sous vide machine. (I used the KitchenBoss G320 Sous Vide Cooker for this recipe where the cooking temperature and the cooking time are to be set at the same time. Set the temperature to 176°F (80°C) and the timer for 90 minutes, then press “ON/OFF” to start.) Make sure you have enough water in your cooking vessel to completely cover the jars.
- Beat the cream cheese and sugar together. In a large mixing bowl, add softened cream cheese and sugar, beat with a hand mixer at medium speed until it’s fluffy and light. (If applicable, you can also use a stand mixer with paddle attachment for the job.)
- Add the eggs, one at a time. Beat until the mixture is well combined.
- Add sour cream, vanilla extract, salt, and lemon juice. Continue mixing until the cheesecake mixture reaches an even consistency without any lumps. When necessary, stop the mixer from time to time and scrape down the sides of the bowl to make sure everything is evenly incorporated.
- Fill the jars. Lay out 9 4-ounce jars, scoop the cheesecake mixture into the jars leaving 1 1/2 inches of room at the top of each jar. Tap the bottom of the jars a few times against a flat surface to shake out the air as much as possible from the mixture. Seal the jars tightly with your fingers only. Do not use the strength of your full hand to tighten the lids. Air needs to come out from the jars while sous vide cooking.
- Sous vide the cheesecake. Carefully lower the jars in the sous vide bath using tongs. You don’t need to wait until the water reaches the desired temperature. Once it does, cook for 90 minutes. Once the timer is up, remove the jars carefully and allow them to cool to room temperature, then refrigerate the cheesecake for at least 4 hours to let it set completely before serving (ideally overnight).
- Make the crust on the stove. Place the graham crackers or digestive crackers in a zip-top bag and use a rolling pin to crumble them. In a medium skillet, melt butter over medium heat, add the crumbled crackers in the skillet to combine with the butter. Sprinkle with cinnamon. Transfer to a bowl and set aside to cool.
- Optional: make the blueberry topping. In the same skillet or a small saucepan. Cook the blueberries with sugar and lemon juice over low heat. Bring to a slow simmer. Cook for 10-15 minutes, stir gently and occasionally, until the blueberries just start to break down and the mixture is thickened. Remove from heat and allow to cool to room temperature, then refrigerate until ready to use.
- Serve the individual cheesecake. Open a jar of cheesecake, add a generous spoonful of blueberry topping and a big spoonful of the loosen crust on top. Dig in!
Nutrition
- Serving Size: 1
- Calories: 341
- Sodium: 402.3mg
- Fat: 22.5g
- Saturated Fat: 12.5g
- Carbohydrates: 29.5g
- Fiber: 1.8g
- Protein: 6.4g
- Cholesterol: 100.1mg
About the Author

Sharon Chen is an Integrative Nutrition Health Coach and author of the Complete Sous Vide Cookbook. She believes food not only brings healing but also connection. As the creator of StreetSmart Kitchen, she aims to make meal prep easier than ever and help you find balance, ease, joy, and simplicity in the kitchen as you improve your well-being.
Are my jars supposed to be floating? 🤔 🥴
Hi Jenna, if you jars are floating, it means there’s not enough batter in the jars, so it’s too light. You can either fill up the jars a bit more or you can put a plate or other heavy heat-resistant object on top of your jars to keep them down. Remember to not to close the jars too tight, so the air can escape under the water. Hope that helps.
Hello, how did you handle the water temperature change as the jars were dropped in? The water was at the 176F, but after I dropped in the jars, the temperature went down 6F. Thank you in advance for your advice.
Hey there! Temperature dropping after putting food in the sous vide is common. Once the jars are in, cover your sous vide container and the temp will go back up quickly. It shouldn’t affect the result of the cheesecake too much as long as the temp is back to 176F quickly. But you can also restart the timer once the temp reaches 176F with the jars inside. Hope that’s helpful. Thanks for trying out this recipe! 🙂
Wow, this sous vide cheesecake in jars looks incredible! I love the idea of individual servings, and the texture must be amazing. Can’t wait to try out this recipe—thanks for sharing such a creative twist on a classic dessert!
How long will these keep in the freezer?
I have to make a bunch for a wedding, and i was wondering if a month in the freezer would be too long.
Thank you.
Hi Lisa, you can keep them in the freezer for up to three months. 🙂
How long are these delicious deserts good in the fridge for? Thank you
Up to 7 days on the safe side but I’ve left them in the fridge for 10 days without an issue. Hope you enjoy them!
Could I replace the sugar with stevia?
Hey Lex, I have never tried it with stevia but I don’t see why not.
Going to make these but wondering if a longer time is needed for 4 ounce jars? How far in advance can I make the blueberry sauce and graham cracker topping? Thank you
Hi Pam, great to hear that you will be making these. No, no need to add more time. I have used the exact temp and time for 4-ounce jars and 8-ounce jars. Both turned out great. I would say that you can make the blueberry sauce three days ahead of time, store in an airtight container/jar, and leave it in the fridge until ready to serve. Same with the graham cracker topping but that doesn’t need to be refrigerated. Hope this helps!
Quick question, I made this today and the cheesecake came out granulated feeling not creamy at all. Going to try again but would you cut down the Sous vide time?
When mixing the cheesecake, mix until it no longer feels grainy. Then it will be creamy.
I also am going to try weighing the sugar and then using the same weight amount of powdered sugar. I feel that may take care of the problem without having to mix so long.
Question: Should I remove the lids before refrigerating to avoid any condensation to fall on top of the cheesecakes? Or will there be no condensation because the jars are sealed?
Hi, I don’t find necessary to remove the lids before refrigerating. In fact, if you do so, the fridge will dry the cheesecake out. There’s not much condensation in my experience. If you see some water on the surface of your cheesecake after refrigeration, you can easily pour it out. It does not affect the the result. Some people remove the lids after sous vide to let the cheesecake cool to room temperature, then put the lids back on before refrigeration. This might address your concerns. Hope this helps.
So far, so good – jars are out of the bath and cooling; looking forward to my first sous vide dessert test drive!
A note of potential confusion – did you mean to say in the recipe “leaving 1/2 inch?” (Regarding filing level)
Bon appetit!
Woohoo…can’t wait for you to try it!
Regarding the filling level, thanks for pointing it out. For 4-oz jars, 0.5-1 inch room should be enough. For 8-oz jars, I think 1 inch is sufficient. Making the changes now. Thanks again!
Please ignore my idiotic comment! I thought my jars were 4 ounces, but they are actually half pints/8 ounces! Apologies!
Haha…no worries, Samantha! Thank you for taking the time to leave your comments. I hope you liked this recipe!
I don’t understand how this recipe would make 9 four ounce jars. I made it tonight and filled four and a half 4oz jars, which would be nine 2oz jars. I don’t think 2 ounces of cheese cake would be a big enough serving, so I am glad I used 4 ounce jars, although next time I might aim for 3ounces to leave more room for toppings. Is the nutrition info for four ounce portions or two ounce portions? And does it include toppings or exclude? Thank you!
I love this idea of making individual cheesecakes! I think I will make them for these Christmas meals.
WoW. Made it last night, so easy and sooooo good. A winner.
Thank you for taking the time to make the sous vide cheesecake. It’s a game changer, isn’t it?
Love this cheesecake recipe. They were such a hit being in individual jars everyone got to add their own topping to customize they way they like. Will definitely be making these again!
What a great idea! These cheesecakes look so smooth and perfectly cooked!
Well this settles it…I need to get into Sous Vide! Looks so good!
Oh, now this is interesting! I have seen all kinds of sous vide recipes over the years, but I’ve never seen a dessert recipe like this before. I can’t wait to try it!
I am pretty sure this would become addicting its looks off the charts delicious and I must make this ASAP!!